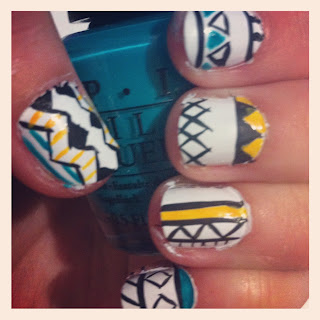
Now this nail is definitely one of the hardest and most time consuming I've done.
BUT IT LOOKS AWESOME! Let's jump right in...
Step 1:
Start off by painting your nails a base colour of white. I used OPI Alpine Snow. The white helps your other colours pop without adding numerous coats.
Step 2:
Now here's where it gets a little tricky. Take your black nail art polish and draw a few tribal outlines on your white nails. Tribal art is a lot of straight lines and triangles. If it helps, you can reference a picture like I've mentioned in earlier posts. You have to have a very steady hand to do this. Because you're drawing on white it's hard to erase your mistake.
Step 3:
It's time to add some colour! I chose bright colours for this because I feel that the colours should pop off your nails! Pick a few nails to put the colour on, you don't have to put the same colour on every nail! I used OPI The "it" Colour (which I just added to my collection). To achieve the small lines I took a small nail art brush and dipped it into the polish. Don't use the actual polish brush... it's WAY to big.
Step 4:
Next I look OPI Fly (from the Nicki Minaj collection) and did the same thing that I did with the yellow. Be as creative as you want! Nothing is wrong when doing tribal, it's all your own design.
Step 5:
Add the rest of the colours you'd like to use. I've also added OPI In my Back Pocket, OPI Panda-monium Pink and Essence Lime Up!.
Step 6:
Finish up by repainting your black lines to clean up your nail. Then add your favourite top coat and you're done!
Now for me this took about an hour, waiting for things to dry and being super careful. It takes a lot of practice to get a really stead hand (for both your right and left), but practice makes perfect! The more you do your nails, the better you'll get!
Thanks for ready :)
Lots of Love,
Mackenzie xox


No comments:
Post a Comment